A while ago I was working on some Rust embedded-hal drivers for the PiicoDev range of open hardware from Core Electronics. PiicoDev already has excellent support in MicroPython and there are existing
embedded-hal drivers for individual pieces of PiicoDev hardware (albeit incidentally; by targeting whichever IC is at the heart of the device e.g. vl53l1x-uld). Nevertheless, I was interested in creating a holistic set of embedded-hal drivers that targeted PiicoDev specifically.
Moving from MicroPython to Rust's embedded-hal, it makes little sense to get too attached to a MicroPython API. There's only so well the API can realistically be replicated in Rust. Choosing to disregard the API of the existing MicroPython drivers was liberating: it allowed me to focus on creating my own API that could best utilize the Rust environment. I feel like I made some interesting API choices but these choices are not really what I want to talk about here.
A problem came up working on these drivers: how do I decide when these are ready to be released? One potential criterion for whether my new drivers pass muster:
Can these new
embedded-haldrivers be used for all of the same things as the existing MicroPython drivers?
This definition is too broad since we can't anticipate the uses of this driver for everyone. The official drivers come with a number of examples though, so perhaps a more realistic definition could be:
Can these new
embedded-haldrivers be used to recreate all of the same examples as the existing MicroPython drivers?
A nice bonus here is that by using this as some kind of acceptance criterion, it follows that the examples need to be ported (and code examples are usually a pretty indispensable resource for API consumers).
Laser Distance Sensor VL53L1X (p7)
I've picked just a single PiicoDev device to focus on here: Laser Distance Sensor VL53L1X. This device is identified as p7 in PiicoDev URLs. p7 is a convenient shorthand to refer to this device and is what I'll be sticking to. The official driver includes a single, simple example for p7:
from PiicoDev_VL53L1X import PiicoDev_VL53L1X
from time import sleep

distSensor = PiicoDev_VL53L1X()

while True:
    dist = distSensor.read() # read the distance in millimetres
    print(str(dist) + " mm") # convert the number to a string and print
    sleep(0.1)
Running the MicroPython Example with Thonny
Thonny eases some of the pain points common to getting started with MicroPython:
- Downloading the right MicroPython interpreter to the Pico.
- Downloading programs and 3rd-party MicroPython libraries to the Pico.
- Initiating a MicroPython session on the Pico for code execution.
The Raspberry Pi Foundation covers using a Pico with Thonny in Getting started with the Raspberry Pi Pico. Core Electronics also provides some instructions for How to Setup a Raspberry Pi Pico and Code with Thonny. These instructions are a bit more relevant to the particular hardware I'm using. And some further instructions from Core Electronic is all that is needed to get the above p7 example running in Thonny. Summarising these instructions:
-
Install an appropriate MicroPython interpreter on the Pico.
Thonny options 
- Copy the PiicoDev Unified Library to the Pico file system.
- Copy the PiicoDev_VL53L1X.py to the Pico file system.
-
Run the above example.
Thonny - main.py @ 1:1 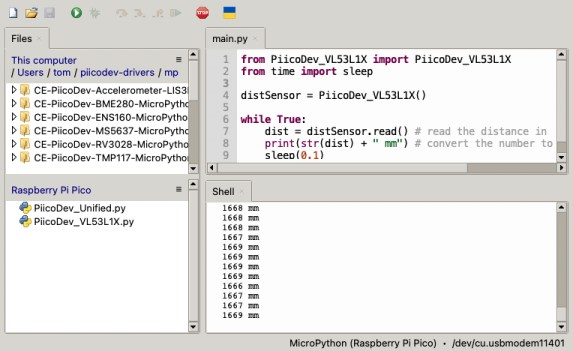
Running the MicroPython Example with mpremote
Thonny is great for interactive operation of a MicroPython interpreter but for running tests something less interactive is ideal. MicroPython makes available a handy tool called mpremote for talking with the interpreter from a host's command line. Steps 2-4 of Running the MicroPython Example with Thonny can be automated through mpremote.
In other words: mpremote can be used for basically all of what Thonny can be used for except for installing a MicroPython interpreter when one isn't already installed. Without Thonny to find the right MicroPython interpreter for a particular development board, it is necessary to carefully select the right one at MicroPython Downloads.
Some popular options:
Running the example with mpremote:
- Hold the BOOTSEL button whilst connecting the Pico to the host. This puts Pico in USB mass storage device mode, ready for the interpreter to be copied to it.
- Copy the downloaded MicroPython UF2 file to the mounted Pico.
- Wait a second or two for the interpreter to become available.
-
Copy the PiicoDev shared library code to the Pico
mpremote cp CE-PiicoDev-Unified/min/PiicoDev_Unified.py : -
Copy the PiicoDev p7 specific driver code to the Pico
mpremote cp CE-PiicoDev-VL53L1X-MicroPython-Module/min/PiicoDev_VL53L1X.py : -
Run the p7 example
mpremote run CE-PiicoDev-VL53L1X-MicroPython-Module/main.py
Condensing this into a script:
# connect to Pico with BOOTSEL held
# assumes that it has been mounted to DEVBOARD_MOUNTPOINT
set -e
DOWNLOADED_INTERPRETER=$1
DEVBOARD_MOUNTPOINT=$2
echo Copying MicroPython interpreter to devboard
cp -X -v $DOWNLOADED_INTERPRETER $DEVBOARD_MOUNTPOINT
echo Waiting for interpreter to come up
sleep 5
echo Copying libraries to devboard
mpremote cp CE-PiicoDev-Unified/min/PiicoDev_Unified.py \
  CE-PiicoDev-VL53L1X-MicroPython-Module/min/PiicoDev_VL53L1X.py :
echo Running example
mpremote run CE-PiicoDev-VL53L1X-MicroPython-Module/main.py
The example runs indefinitely but can be disconnected from with Ctrl+X. This automates basically all of the steps involved in running this example except
- selecting and downloading the right interpreter
- putting the Pico in the right state for installing the interpreter
Installing MicroPython Without Holding BOOTSEL
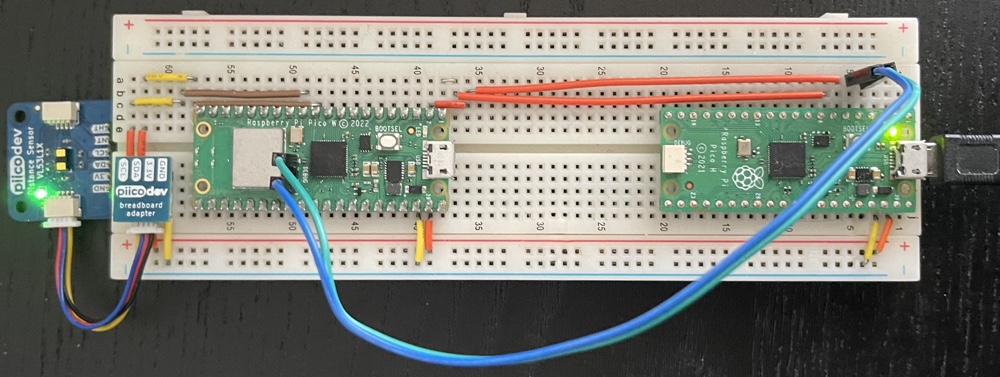
Being familiar with running code on the Pico with probe-rs, needing to connect the Pico with the BOOTSEL button held just to install the interpreter does not seem strictly necessary. The rp2040-project-template is what originally got me onto using probe-rs for programming the Pico in a Rust environment. It is a great starting point if you're somewhat familiar with Rust but have never used it on the Pico before.
Using probe-rs with the
Raspberry Pi Pico requires a probe. Two easy options for getting your
hands on a probe:
I don't own one of the purpose-built probes but I do have a spare Pico. So I've used that as my probe.
MicroPython binaries are distributed as UF2. UF2 is a pretty handy
format. It is designed expressly for ease-of-use. A device makes itself
available as mass storage (for the Pico this is when a BOOTSEL button
is held during connection) and any UF2 file copied to this storage is
treated as a new binary to run. probe-rs does not accept UF2
files for programming (but will for
version 0.21.0). This is only a minor problem though because there is
an official tool
to convert any UF2 file to a plain-old Bin format that is acceptable to
probe-rs.
% uf2/utils/uf2conv.py DOWNLOADED_INTERPRETER
--- UF2 File Header Info ---
Family ID is RP2040, hex value is 0xe48bff56
Target Address is 0x10000000
All block flag values consistent, 0x2000
----------------------------
Converted to bin, output size: 700416, start address: 0x10000000
Wrote 700416 bytes to flash.bin
The output here is important. It gives us:
- The path for the new Bin file:
flash.bin - The memory address that this file targets when it is installed to the Pico:
0x10000000
This information can be fed fairly directly into probe-rs
% probe-rs download --protocol swd --chip RP2040 --format bin \
> --base-address 0x10000000 --disable-progressbars flash.bin
    Finished in 44.151s
Now the interpreter is installed and running on the target Pico without having to reconnect it with BOOTSEL held every time a re-installation is required.
Installing MicroPython and Running the Example Without Holding BOOTSEL
A separate connection is still needed by mpremote to control the
MicroPython interpreter (for important things like running the example). That is
not actually a problem though: using a USB connection to the probe to install
the MicroPython interpreter does not preclude a concurrent USB connection
directly to the target. In other words, probe-rs can have its
connection for installing MicroPython and mpremote can have its
connection for communicating with the interpreter. This is how I ended up with a monstrous testing apparatus
Having connected the host to the target and the probe, manual intervention is no longer necessary to install the interpreter and run an example:
set -e
DOWNLOADED_INTERPRETER=$1
git clone --depth 1 https://github.com/microsoft/uf2.git uf2
uf2/utils/uf2conv.py $DOWNLOADED_INTERPRETER
echo Installing MicroPython interpreter
probe-rs download --protocol swd --chip RP2040 \
    --format bin --base-address 0x10000000 flash.bin
echo Waiting for interpreter to come up
sleep 5
echo Copying libraries to devboard
mpremote cp CE-PiicoDev-Unified/min/PiicoDev_Unified.py \
  CE-PiicoDev-VL53L1X-MicroPython-Module/min/PiicoDev_VL53L1X.py :
echo Running example
mpremote run CE-PiicoDev-VL53L1X-MicroPython-Module/main.py
Running A Rust Example
Coming back to the problem of validating Rust drivers by running example code, let's look at what the main loop of a Rust example might look like:
loop {
    // read the distance in millimetres
    let dist = dist_sensor.read().unwrap();
    // convert the number to a string and print
    println!("{} m", dist.to_f64() / 1000.0_f64);
    delay.delay_us(100_000);
}
probe-rs provides a mechanism called Real-Time Transfer that carries program output from the target to the host in real-time over the same connection used to program the target. Readings from p7 will be printed every decisecond indefinitely (until interrupted with Ctrl+C):
% probe-rs run --protocol swd --chip rp2040 --no-location  \
> target/thumbv6m-none-eabi/debug/examples/p7 2>/dev/null
1.623 m
1.623 m
1.628 m
1.626 m
1.626 m
Validating Rust Example Against MicroPython Example
Whether running the Rust example or the MicroPython example, the program output ends up in the same place: STDOUT. Thus, a process to validate the Rust example against the MicroPython:
- Collect output from the MicroPython example
- Collect output from the Rust example
- Compare the output collected from the Rust example with the output collected from the MicroPython example
With just a little bit of work this process can be adapted for Rust; even integrating with the default test runner. The details of reaching out to the target and running the different examples are hidden away in a support module for the test here:
mod support;

fn parse_line(line: &str) -> i16 {
    let (value, unit) = line.rsplit_once(' ').unwrap();
    assert_eq!(unit, "mm");
    value.parse().unwrap()
}

#[test]
fn p7_test() {
    let mut micropython_example = support::Example::run_micropython(
        "mp/CE-PiicoDev-VL53L1X-MicroPython-Module/main.py",
        vec![
            "mp/CE-PiicoDev-Unified/min/PiicoDev_Unified.py",
            "mp/CE-PiicoDev-VL53L1X-MicroPython-Module/min/PiicoDev_VL53L1X.py",
        ],
    );
    let micropython_output: Vec<i16> = micropython_example
        .output().take(10).map(|l| parse_line(&l)).collect();

    let mut example = support::Example::run("p7");
    let output: Vec<i16> = example
        .output().take(10).map(|l| parse_line(&l)).collect();

    assert!(output.iter().zip(micropython_output)
        .all(|(mm, mp_mm)| (mm - mp_mm).abs() < 10));
}% cargo test
Finished test [optimized + debuginfo] target(s) in 0.36s
Running tests/p7.rs (target/debug/deps/p7-0c2d20189102e932)
running 1 test
test p7_test ... FAILED
failures:
---- p7_test stdout ----
thread 'p7_test' panicked at 'assertion failed: `(left == right)`
left: `"m"`,
right: `"mm"`', tests/p7.rs:6:5
note: run with `RUST_BACKTRACE=1` environment variable to display a backtrace
failures:
p7_test
test result: FAILED. 0 passed; 1 failed; 0 ignored; 0 measured; 0 filtered out; finished in 40.22s
error: test failed, to rerun pass `--test p7`
Oh no! The test has failed! The wrong units have been used. Correcting the example:
loop {
    // read the distance in millimetres
    let dist = dist_sensor.read().unwrap();
    // convert the number to a string and print
    println!("{} mm", dist);
    delay.delay_us(100_000);
}% cargo test
Finished test [optimized + debuginfo] target(s) in 0.36s
Running tests/p7.rs (target/debug/deps/p7-0c2d20189102e932)
running 1 test
test p7_test ... ok
test result: ok. 1 passed; 0 failed; 0 ignored; 0 measured; 0 filtered out; finished in 56.51s
Running tests/support.rs (target/debug/deps/support-797f4721340a568e)
running 0 tests
test result: ok. 0 passed; 0 failed; 0 ignored; 0 measured; 0 filtered out; finished in 0.00s
A Problematic Approach?
So I've been able to use a Rust example corresponding to a MicroPython example as some kind of proxy for whether or not my Rust driver is a suitable replacement for the MicroPython driver. There are notably some problems with the approach I've taken:
- It relies on the stability of p7 readings. A 10mm margin of error was deemed acceptable fairly arbitrarily. This was the maximum range after 1000 readings. A larger range of readings is captured when more readings are captured.
- It relies on the stability of a physical environment. I kept p7 stationary and had it pointed at my ceiling. What about incidents like earthquakes (or more minor incidents like bumping the desk I've attached the p7 to). Other than ensuring the stability of the environment as best you can, the main other way to mitigate environmental stability is by loosening the test (thus undermining its usefulness).
- It assumes physical interaction with p7 during test is not necessary. Testing a laser distance sensor this way is all well and good but what if I wanted to test an NFC card reader? Would some kind of test jig be necessary? If so, the control of the jig would be another concern for the test (an annoying burden in terms of complexity).
- It assumes uniformity in p7 devices. For my testing to be useful I need for it to be making a statement about more than just my p7, I need it to be making a statement about all p7 (or some archetypal p7). For all I know I've baked assumptions about my p7 into the test (other p7 could be prone to more noise). Here consulting technical specifications would be useful (I haven't done this yet).
- It assumes uniformity in environment. What if it's not possible for somebody else to recreate the physical environment I have used? Have I been specific enough in my description of the test environment?
There are probably more issues to consider than just these. Overall, the setup and reproducibility is not perfectly certain. Web developers often talk about tests being flaky. It's reasonable to expect some flakiness in my driver acceptance tests. I don't expect to be running these tests much though (only to determine whether or not a new version of a driver crate is suitable for release). Just how burdensome will it be for me to deal with flaky driver acceptance tests? I feel like this is something to be borne out by usage.
Improvements
There are definitely some issues with what I've come up with here. Some improvements I'm keen to try:
- Keeping Rust and MicroPython examples installed on the target simultaneously. There is certainly enough flash memory available for this to be feasible. This necessitates re-targeting the MicroPython (or Rust) binary and then having some way of passing execution between these. It would vastly improve how long it takes for tests to run (the vast majority of time taken in running the test is reinstalling MicroPython).
- Including my testing as part of CD. I already have some GitHub actions that run unit tests and linting with every push. By using a 'custom runner' I should be able to run these tests automatically on every release. This should help with keeping the tests focussed on being able to be run without manual intervention and it should help with making it harder to obscure whether or not they were run for a particular release.
- Specify environmental conditions for each test.
- Use 3rd-party assertion crates to improve test readability.
- Eliminate the need for 2 USB connections. Needing 2 USB connections is more than just an annoying requirement. There is work necessary to make sure the right connection is being used for the right thing. If I accidentally try to use the MicroPython connection for
probe-rsthen the test fails. This somewhat dovetails with keeping Rust and MicroPython examples installed simultaneously. If I could use the Rust environment for getting at MicroPython state or vice versa then I maybe wouldn't need 2 USB connections. It'd be nice if MicroPython supported RTT but adding this support is no minor feat.